How to use Collections and Tags to organize your Shopify online store
This post covers how to use Collections and Tags within Shopify to organize your online store and set yourself up for success. By implementing these steps, you're sure to save yourself time in the future and help boost your Search Engine Rankings along the way.
When adding products to your Shopify store, it’s important to establish a system to organize all of your listings. This makes it easier for both the business owner and the site visitor to find and filter products.
In Shopify, you can use tags and collections to organize and filter products.
However, it can be confusing if you haven’t done it a few times. In this post I’ll go over what the difference in Collections and Tags are and how to use them.
Let’s start with the basics.
What are Tags and Collections?
Collections - A great way to group products together making it easier for customers to find them.
Tags- Are used to narrow down that group of products even further using key terms. Tags take organization to the next level by allowing you to filter products by key words. (I’ll talk more about tags below)
Here’s an example of Tags and Collections in action:
Say that you own a skincare company and you sell body oils, body wash, face moisturizers, and face cleansers.
To make it easier for your customers find each product, you can add body oil and body wash to a collection titled “body” and add face moisturizer, face cleanser to the collection “face.”
Then, to make it even easier for customers to find a product that fits their needs, you could create tags to each of the above collections. For example, for the collection face moisturizer, you could tag your products with things like “acne prone skin” or “dry skin” or “oily skin.”
How to add a Collection in your Shopify site:
Login to your Shopify admin account
Navigate to your online store
Under the Product section, click on Collections
Once you've clicked "Create collection," you'll be prompted to fill in a lot of information. In the below section, I'll walk you through how to set them up for success.
Shopify create collection page.
Title
When deciding what to name your collection, it’s important to think about what would make sense to a site visitor that has never used your products before. A skincare company might want to have a collection titled “body” instead of using the product name because a site visitor probably doesn’t know the exact name of all of your products. Pick a title that’s simple, straight forward, and easy to understand.
Description
This section is labeled as “optional” but I highly recommend filling it out to help with your search engine rankings. By adding a simple description of the collection and products inside it, you’re telling Google and other search engines what your pages contain. This ultimately helps you rank higher.
Automated vs Manual Collections
There are two different types of collections that you can create.
Automated Collections adds related or matching items into your collections for you automatically. This is done by using “Conditions” (which I’ll talk about in the next section) Most Shopify users like to use automated collections because it's much quicker. Once you’ve set the collections and conditions up, everything else is taken care of every time you upload a new product. Each collection can have up to 60 automated conditions.
Note: You cannot remove products from an automated collection once they are in it unless you change the conditions or edit the product to no longer suit the conditions.
Manual Collections only include the particular product that you have individually selected. This type of collection requires more work to maintain and update, but they do allow for more customization. Manual collections are great for seasonal or one-off sale events because you can set up a smaller manual collection and remove it after the event is over.
Conditions
Conditions are a set of rules which the collection will follow when automatically adding products to it. Here’s an example:
I run a skincare company. I have all kinds of body washes and face products, but I’m growing really fast and don’t have the time to add each new product to collections by hand.
Instead, I create a collection which is set to automatically add products to it if they meet certain conditions. In this case, I set the conditions to only add products that have the tag body attached to them. Then, when adding my new products, I tag every item I want to end up in that collection with body.
Another reason to use conditions is to hide out of stock products. In this case, you would add another condition to only show a product with an inventory quantity above 0.
Here’s an example of how Shopify defines each option for conditions.
You can add a condition to include a product in a collection based on the products:
title, variant title, type, or vendor
tags
price, weight, or inventory stock
And like I mentioned earlier, you can add up to 60 conditions per collection.
Search Engine listing preview
This should be done automatically after you’ve filled out the collection title and description. The only reason to edit this section is to simplify what you’ve said in your product description section to make it easier to read on a search engine page. If the preview makes sense and looks okay, I don’t suggest editing anything here.
So now that we’ve gone over what collections are, and how to add them, let’s discuss collections within collections. (I promise it’s not as tricky as it sounds!)
Sub collections
We already know that collections are a powerful tool to group things together in Shopify. But, what’s even more powerful and beneficial is to put collections inside of each other.
Here’s an example of a collection within a collection:
Let’s stick with the skincare example and pretend that you sell 5 different body oils, 5 different body washes, 5 different face cleansers, and 5 different face moisturizers.
Your navigation bar would have buttons for Body and Face. Body oils and body washes would be under the body collection and face moisturizer and face cleanser under the face collection. Your site visitors would be able to find the body wash that they were looking for easily and quickly.
A Collection inside of other collections are considered sub collections. Once the site visitor is on the sub collections, they can see and use the tag filters.
Before you create your sub collection, use these steps to decide how to organize your sub collections:
"Body and Face" collections need to holds multiple different but related product types
Narrow down to a second level of more specify collections like body oil, body wash, face cleanser, and face moisturizer
Use tags like acne prone, dry skin, or oily skin to filter down further
How to create sub collections
Login to your Shopify Admin account and click on the Navigation section
If you have already created your menu, you can edit it. All you need to do in this case is click on it and go to the menu editing page. If you don’t have a menu yet, you need to create one. To do this, click on Add menu
Add all of your collection titles
Then, all you need to do, is drag the sub collections with your mouse to nest them into the parent collection
This approach is simple and quick and creates a site structure that features sub-collections using the menu.
Sub-Collections Improve the shopping experience
The best reason to use sub collections it that they make your customers experience with your website better.
When creating your Shopify site, try to visualize the structure of your site. As your business grows and your assortment or products expand, you will need to add sub collections to your existing menu more than once.
Structuring this site is convenient for your site visitors, and helps you avoid creating duplicate pages that significantly affect your site ranking in search results.
Tags
Now let’s get back to tags and how to use them. We already defined tags as a way to group and filter products by key words.
Tags take site organization to the next level. Here’s an example of what we could tag a pair of pants with.
Women's
Denim
High-rise
Best Seller
These tags would allow customers to find your best selling women’s denim, and internally you could use the tags women’s, best seller, denim, to create collections for women’s pants and women’s best sellers.
Note: Tags are not case sensitive
A general best practice is to add tags to your products for any important characteristic that would help you organize your collections internally and for your customer to find what they are looking for.
Themes and Tags
Some themes do not show tags on their product page. So, make sure to check this out before you pick your theme. Otherwise, you will have to edit your stores code.
Why should I use tags over Type or Vendor?
Unfortunately, Shopify doesn’t give your customers an option to filter by Type or Vendor. The only way your customers can filter products is by tags.
A word of caution
Many Shopify themes will show any product tags as filters in your collection. Meaning that for every tag you add, it may end up in the sidebar of your Shopify collection as a filter.
Sorting by Best Sellers
Another great way to use Tags is to add the tag “Best Seller” to your most popular items. This gives site visitors a chance to see your best selling products all together and makes it easy for you to edit and add other products to this section.
Sorting by sale
Let’s say you want to run a 20% off sale on a hand-picked selection of products in your Shopify store. By adding a product tag such as on sale to your selected products, you can
create a collection of On Sale products that can be displayed on your home page, product page, and as a filter
Create a discount code for 20% off based on the tag used
Do Tags impact SEO?
If your theme lists the product tags on the product page, then they become page content that Search Engines can read.
Some themes do not have a list of product tags - therefore making it invisible and Search Engines can’t see it. I recommend choosing a theme that shows product tags.
An easy way to remember what search engines see is that they read a page like a person would. So if you can see your tags, then a Search Engine can too.
How to add tags
In your Shopify Admin account, click on Online Store
Click on Products on the left hand side
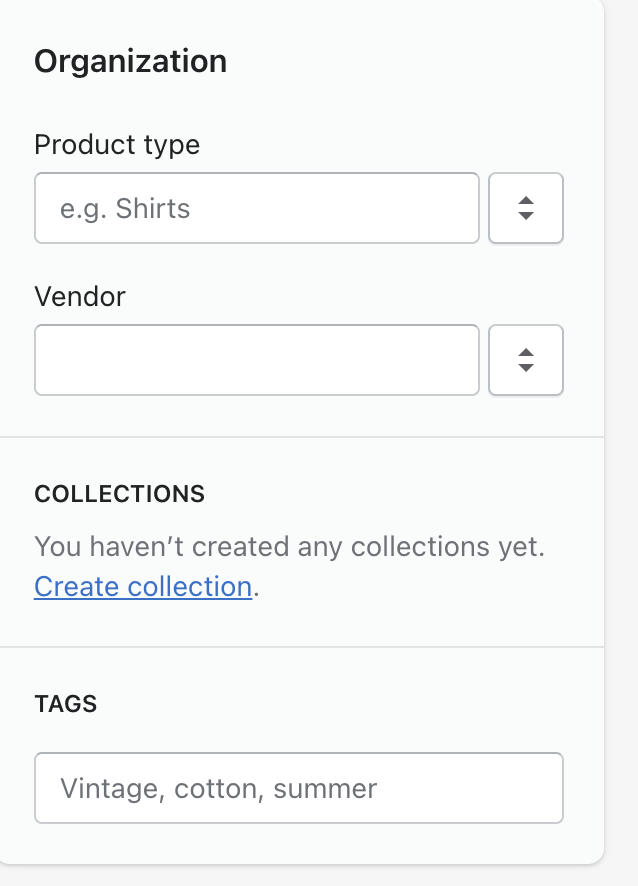
On your product page, scroll down and look towards the left. There will be a section titled Organization. At the bottom of that section, you'll have an option to add your tags.
Adding and understanding how to use collections and tags can be time consuming. However, if you take the time to understand how Shopify organizes products, you're sure to set yourself up for success and save time in the future.
As always, if you have any questions or need help with your site, send me a note!